Claude Code Just Got Eyes: A Complete Walkthrough for Letting Computer Use Handle Your Screen
A complete walkthrough of using Claude Code's Computer Use feature to operate native apps from the CLI. Setup, permissions, and gotchas — the first systematic field report covering everything I learned.
What you'll learn in this article
- Where pricing and adoption questions around Claude Code stand right now
- Which plan or rollout stage fits the reader's situation
- Which follow-up article to open next for setup, cost, or bigger-picture context
I use Claude Code every day. It writes code for me, edits my files, runs my tests. For any work that fits inside a terminal, it’s already faster than I am.
But one thing kept nagging at me. In front of “apps that only run as a GUI,” Claude was completely powerless. Open a browser and click a button, navigate a desktop app’s menus, verify behavior in a simulator. That part, I had to do myself.
On March 23, 2026, Anthropic added a “Computer Use” feature to Claude Code. It’s labeled a research preview, but if you’re on Pro or Max, you can try it today.
When I first heard “operate native apps from the CLI,” honestly, I was skeptical. After actually setting it up and running it, it exceeded my expectations. In this article, I’m sharing every step I took from zero to working setup, along with all the snags I hit.
I burned three hours on this — I want you to get through it in 15 minutes.
The flow of this article is: ① Understanding the mechanism → ② Preparation and setup → ③ Live demo → ④ Gotchas. You can read it in any order, but for your first time, going through it sequentially will get you running fastest.
What it means for AI to have “eyes” — let’s understand the mechanism first
When you hear “AI operates the screen,” it might sound like magic. The mechanism is simple.
Computer Use runs in a 3-step loop.
- Take a screenshot — Claude captures the screen
- Analyze the image — recognizes UI elements at the pixel level and decides the next action
- Execute the action — clicks, types, scrolls, etc.
It repeats this “until the result reaches the goal.” What humans do with a mouse and keyboard, reproduced on a screenshot basis.
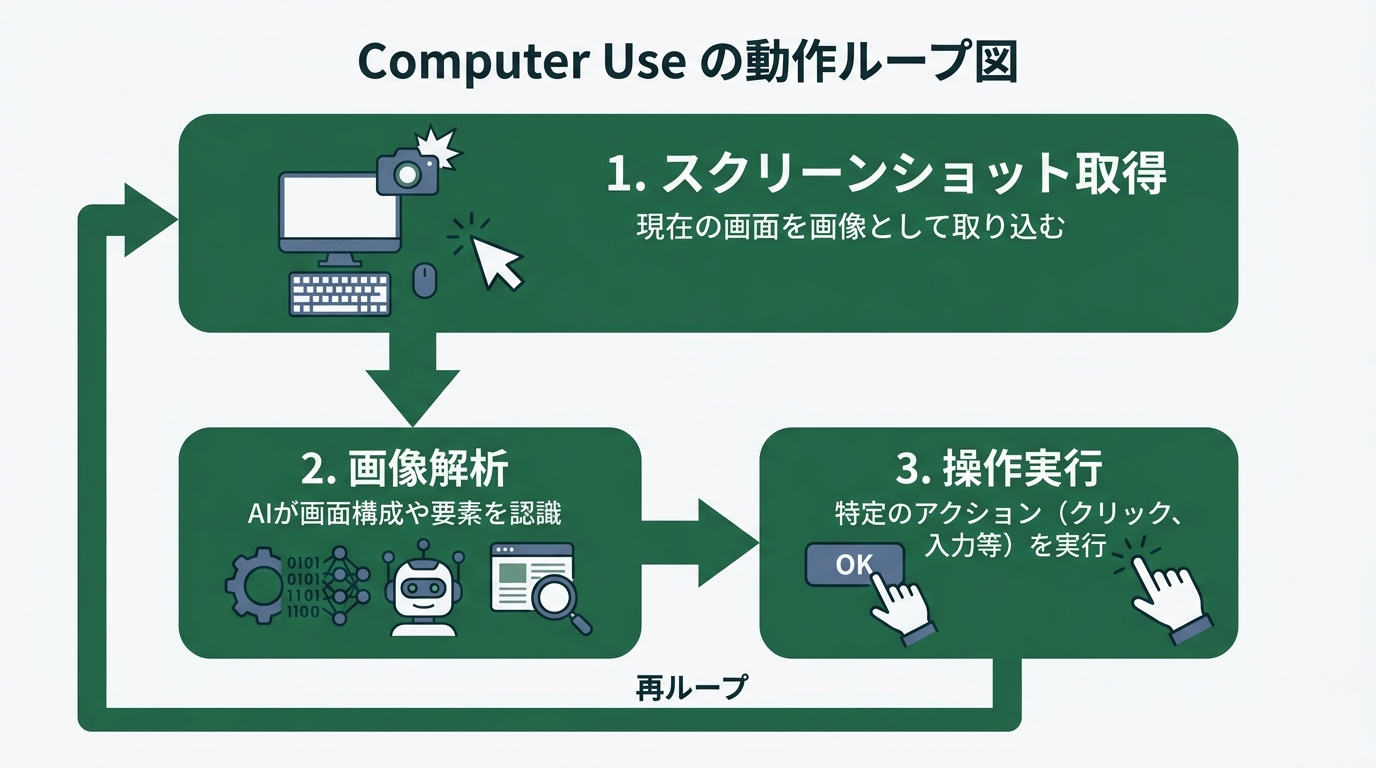
The key point is that it operates by understanding “what the screen looks like.” Even GUI-only apps with no API or CLI can be operated by reading button positions and text from the image.
Here’s a concrete list of what it can do.
- Launching and operating native apps: Open Xcode, build, and automate verification all the way through the simulator
- Browser operations: Filling forms and clicking buttons in web apps
- File drag & drop: Supported as of the Q1 update
- Multi-monitor recognition: Handles operations spanning multiple screens
- Clipboard operations: Automating copy & paste
The wall of “things you could only do via GUI” can now be broken through from the CLI. With this mechanism in your head, let’s move on to preparation.
Before you start: from checking requirements to setup
Three conditions to check
To try Computer Use, there are three conditions. Miss any one and it won’t launch.
Condition 1: Pro or Max plan
It doesn’t work on the free or Team plan. You need either the Pro plan ($20/month) or the Max plan ($100/month). If you’re already on Pro, there’s no additional cost.
Condition 2: macOS (as of April 2026)
At the moment, only macOS is supported. Windows and Linux aren’t supported yet, with the official documentation noting that a Windows version is planned. On macOS, you’ll need Accessibility and Screen Recording permissions.
Condition 3: Claude Code v2.1.85 or higher
If your version is too old, the feature won’t appear. Check it in your terminal.
# Check version
claude --version
# Example output: claude-code v2.1.92
If it’s below v2.1.85, update it.
# Update via npm
npm update -g @anthropic-ai/claude-code
Full setup walkthrough: from launch to “AI grabbing your screen” in 15 minutes
Once all three conditions are met, it’s on to setup. I’ll explain assuming macOS.
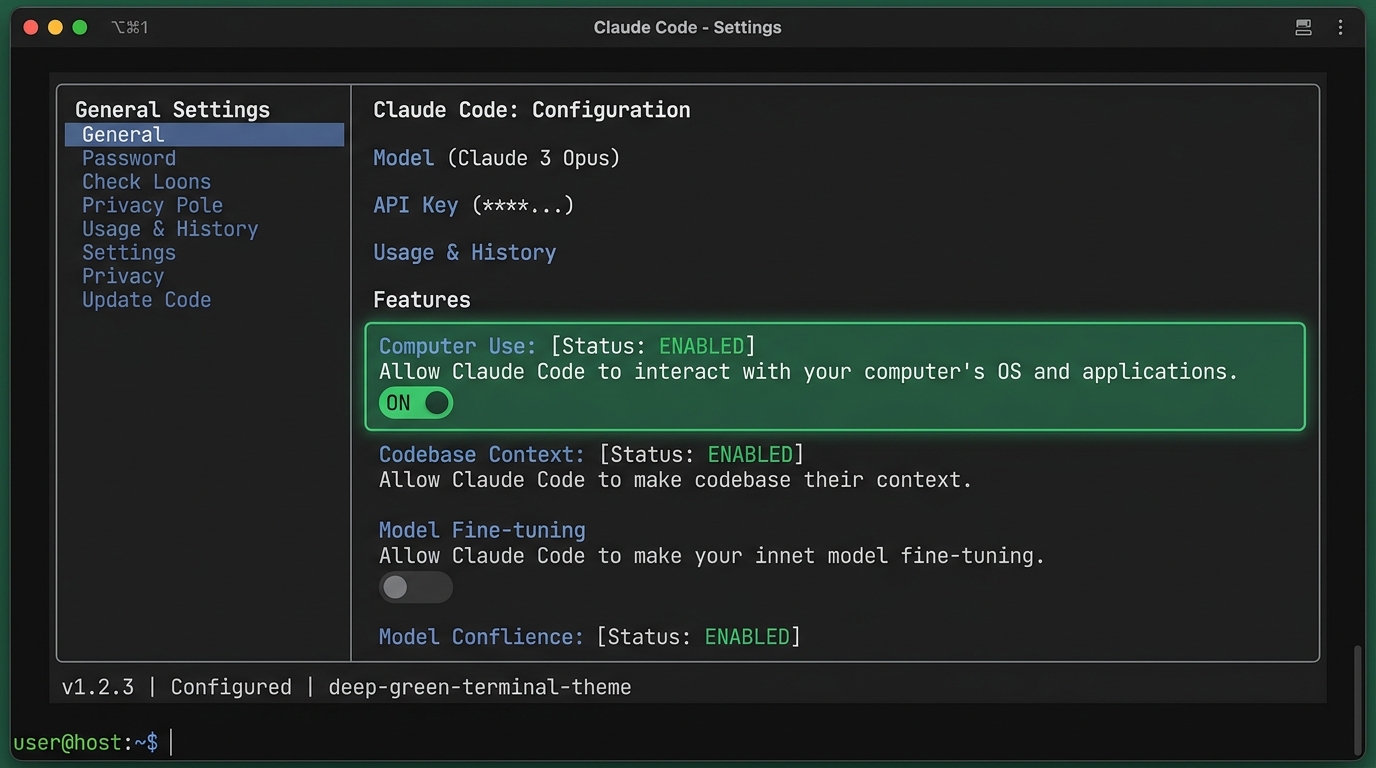
Step 1: Enable Computer Use
Launch Claude Code and open the settings.
# Launch Claude Code
claude

# Open settings (run inside a session)
/config
In the settings menu, there’s a “Computer Use” toggle. Enable it. Settings are saved per project, so once you turn it on, it stays on for next time.
Step 2: Grant macOS permissions
The first time Computer Use tries to operate your screen, macOS will request two permissions.
Accessibility: Needed for Claude to click, type, and scroll. Screen Recording: Needed for Claude to see the screen.
Grant both from “System Settings → Privacy & Security.”
System Settings → Privacy & Security → Accessibility
→ Enable your terminal app (Terminal / iTerm2 / Warp, etc.)

System Settings → Privacy & Security → Screen Recording
→ Enable your terminal app
A heads-up here. After granting Screen Recording permission, you may need to restart your terminal. If you get a “Permission denied” error despite granting permission, close the terminal and reopen it. I burned 20 minutes on this one.
Step 3: Your first Computer Use run
Once permissions are granted, all you need to do is give an instruction in natural language inside a session.
> Open Safari and search for "Claude Code Computer Use" on GoogleOn the first run, you’ll see a confirmation dialog asking “which app to operate.”
Claude wants to control: Safari
[Allow for this session] [Deny]
If you pick “Allow for this session,” Safari can be operated during that session. Close the session and permission resets.
Three safety mechanisms worth knowing
I get the fear of “handing the screen over to AI.” I was nervous at first too. Thanks to the following three safety mechanisms, it stays within the boundary of “operating only the apps you’ve allowed, while you’re watching.”
- App isolation: During operation, apps you haven’t permitted are automatically hidden. No worry about unintended apps being touched
- Terminal exclusion: Your terminal window is excluded from screenshots. The contents of your instructions and your API keys don’t end up in the captured image
- Automatic restoration: When Claude’s operation turn ends, the hidden apps are automatically restored

Putting it to work: “write code, build it, verify on screen” — all in one command
Now that setup is done, I want to show you how this actually plays out.
Case 1: Verifying a web app
I asked Claude Code to build a simple counter app in React, run it in the browser, and verify it works.
> Build a counter app in React, start it with npm start,
> and click the button 3 times in the browser to verify it works
Here’s what Claude did.
- Ran
npx create-react-app counter-app(CLI) - Wrote the counter code in
src/App.js(CLI) - Started the dev server with
npm start(CLI) - Computer Use takes over here: The browser opens, the counter appears
- Clicked the ”+” button. Three times. Verified via screenshot that the number incremented
- Reported: “Counter correctly increased from 0 to 3”
The cycle of “write code → build → verify on screen” closed inside a single command.
Until now, this required a round-trip: “have it write the code → open the browser myself → verify behavior myself → tell Claude the result.” That round-trip goes to zero.
Case 2: Operating a desktop app
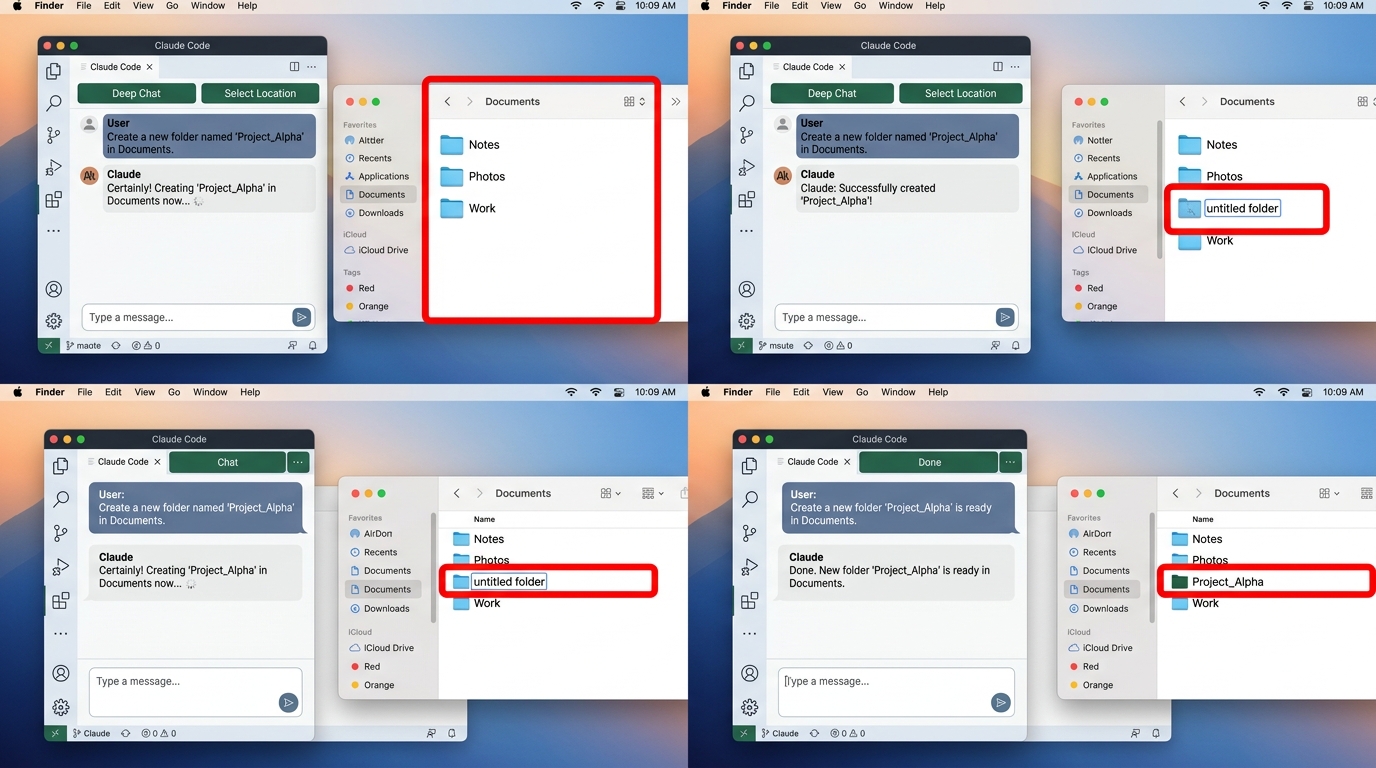
The other thing I tried was operating Finder (macOS’s file manager).
> Open Finder and create a new folder called
> "claude-test" in the Documents folder
Claude moved through these steps.
- Launched Finder (Computer Use)
- Clicked “Documents” in the sidebar (Computer Use)
- Right-click → New Folder (Computer Use)
- Typed “claude-test” as the folder name and pressed Enter (Computer Use)
- Confirmed via screenshot that the folder was created
If it were CLI-only, mkdir ~/Documents/claude-test would have finished it. But what’s important in this example is the proof that “AI can understand and execute GUI operation steps.” The same thing works for GUI-only apps that can’t be reduced to a CLI.
Build your baseline with /powerup: what’s inside the 18 lessons
There’s a feature you’ll want to know about alongside Computer Use: the /powerup command.
On April 1, 2026, Claude Code v2.1.90 added this interactive tutorial feature (see the Claude Code release notes). You can learn Claude Code’s major features with animations, right inside the terminal.
# Launch /powerup
> /powerup
# Use arrow keys to pick a lesson → Enter to start
As of April 2026, there are 18 lessons.
- Context management: How to use CLAUDE.md, how to pass project information
- Hooks: A mechanism to auto-run shell commands before/after tool execution
- MCP: Configuring connections to external tools
- Subagents: How to split tasks and run them in parallel
/loopcommand: How to set up periodic execution and monitoring
This is perfect for people who find “reading documentation a chore.” Without leaving the terminal, you can learn features while watching the actual demo. The fact that it’s available to all users — Pro, Max, or free — is also nice.
The Hooks lesson was especially useful for me. I set up “auto-run lint on file save” in 5 minutes while watching the lesson. If I’d been reading docs, it would have taken 30 minutes.
All the gotchas, exposed: the 5 walls I hit and how I got past them
This might be the real meat of the article. Both setup and operation “work if you follow the steps,” but there’s always a moment when the steps don’t work. Let me share the 5 walls I hit in advance.
Wall 1: Screen Recording permission isn’t taking effect
Symptom: You turned on the permission, but you still get “Screen recording permission not granted.”
Cause: Changes to macOS permissions may require restarting the app.
Fix: Fully quit your terminal app and restart it. Not “close window” — quit it with Cmd+Q.
Wall 2: You don’t notice your version is too old
Symptom: The Computer Use toggle isn’t in the settings screen.
Cause: Your Claude Code version is below v2.1.85.
Fix:
# Check the current version
claude --version

# Update via npm
npm update -g @anthropic-ai/claude-code

# Check the version again
claude --version
If your npm global install isn’t on the right path, an old version can linger. Check the path with which claude.
Wall 3: The target app can’t be found
Symptom: You said “Open Safari” but got back “Cannot find application.”
Cause: The app name may not be exact. On macOS it’s “Safari,” but third-party apps sometimes need their full name.
Fix: Check the app names inside /Applications/ and instruct using the exact name.
# List apps
ls /Applications/
Wall 4: Operations stop midway
Symptom: While Claude is operating the screen, a popup or notification appears and interrupts the operation.
Cause: macOS notifications and system dialogs interfere with Computer Use’s screen recognition.
Fix: Turn on “Do Not Disturb” before operating. You can enable it from Notification Center. It took me three redos to figure this out.
Wall 5: Japanese input is flaky
Symptom: When typing Japanese text, the IME conversion candidates get in the way and you can’t input correctly.
Cause: Computer Use sometimes can’t accurately recognize the IME (Japanese input method) conversion window.
Fix: When Japanese input is needed, switch to English mode beforehand and give the instruction. Pasting Japanese text via the clipboard is more stable.
> Open a text editor and paste the Japanese text
> from the clipboard
Just knowing these five in advance should cut the stress significantly.
Wrap-up: a CLI agent with “eyes,” and what’s next
What I felt after using Computer Use is that it’s an extension of the “vibe coding” we’ve had so far.
Vibe coding was the style of “instructing in natural language and having code written for you.” Add Computer Use, and the scope of instructions widens from “write code” to “operate the screen.” Write code, build, run, verify. The whole cycle can now turn on natural language.
I’ve taken to calling this “vibe operating.”
I used to walk away from code. I thought I couldn’t match a pro engineer. After meeting Claude Code, I felt like a master engineer had taken up residence inside me. And now, with Computer Use added, it’s as if that master engineer said “I’ll handle the screen operations too.”
That said, don’t forget this is still a research preview. Operation accuracy isn’t 100%, and complex GUI actions can fail. There’s still some flakiness in Japanese environments.
Rather than “an all-purpose automation tool,” it fits better as “a new experiment that extends the CLI.” Don’t expect perfection — touch it with the mindset of “lucky if it works.”
According to Pragmatic Engineer’s February 2026 survey, Claude Code was picked as the “most-loved tool” by 46% of developers. Computer Use will likely push that rating even higher.
Let me sum up the key points.
- What it can do: Operate native app GUIs from the CLI. Runs on a screenshot → analyze → operate loop
- What you need: Pro or Max plan, macOS, Claude Code v2.1.85 or higher
- Setup: Turn on Computer Use → grant macOS permissions → instruct in natural language. Done in 15 minutes
- Gotchas: Permissions need a restart to apply. Turn off notifications. Japanese input is more stable via the clipboard
- Current status: Research preview. Not perfect, but well worth trying as an extension of the CLI
If you haven’t tried it yet, start with /powerup today. Going through the 18 lessons to grasp Claude Code’s overall features, then moving on to Computer Use, is the fastest route.
An AI that only “wrote code” has reached the point of “operating the screen.” What will it be able to do next? I want to watch that change from the front row, and I’ll keep writing here about everything I experience.
For someone who once walked away from code, the future where I can build products together with AI feels one step closer.

正直、一度エンジニアは諦めました。新卒で入った開発会社でバケモノみたいに優秀な人たちに囲まれて、「あ、私はこっち側じゃないな」って悟ったんです。その後はカスタマーサクセスに転向して10年。でもCursorとClaude Codeに出会って、全部変わりました。完璧なコードじゃなくていい。自分の仕事を自分で楽にするコードが書ければ、それでいいんですよ。週末はサウナで整いながら次に作るツールのこと考えてます。